
A step-by-step process on how to create your website on your own
Step-by-step process to create your website!

What will we see in this post
Many people know the importance of placing their brand on the digital stage; after all, the internet is one of the first places someone uses to look for solutions to a problem. However, most entrepreneurs face a difficulty: can I create a website for my business on my own?
Few people know anything about programming and anyone who wants a website usually hires developers to perform this task. Of course this is a good idea, especially if you can afford this type of service.
However, what happens is that hiring a developer can be more expensive than expected, so you may end up giving up on the idea of creating a website. But what many people don’t know is that you can do this on your own, even without programming skills, and this is what we are going to talk about today.
In this post, you will learn how to create a website and start investing your time in this strategy for your business.
Why is it important to have a website?
Before we teach you the step-by-step process to create a website, we need to explain why this is a good strategy for all types of businesses, whether they are online or physical.
You may have noticed that it has become increasingly common to search for solutions to problems and to clarify doubts online.
When the subject is buying a product or hiring a service people use search engines such as Google and YouTube for their shopping solutions.
For example:
If someone wants to buy a couch, it is quite likely that before going out looking for one at a physical store, they search online to find the best prices and types of couches they can choose from.
Having a website is an excellent way to reach potential consumers and even maintain a relationship with your customers. This is because you can turn your website into a showcase for people to see your products/services and especially, understand your brand, your values as a company and know exactly what you have to offer.
How do I create a website on my own?
As we mentioned before, you can create your own website without the help from someone who is an expert on the subject.
If you have any programming knowledge, you will certainly be able to create your website easily and especially with more features.
But, if you don’t have a lot of knowledge, you can follow the step-by-step process that we’ll show you in the next few topics.
It is important to remember that when we talk about something that involves programming language, i.e., coding standards such as JavaScript, it will always be difficult for those who are starting out and don’t know anything about it.
But if your goal is to get your website up and running, you can create something much simpler and when you notice the need to improve on what you already have, you can invest and hire someone to make a few changes or even study more about programming to improve your own page.
We want to make it clear that we will not teach you how to create a website with different resources and specific plugins for your business. The goal here is for you to have a webpage as an additional tool to promote your products and services.
Step-by-step process to create a website
If you got this far, you have probably realized that having a website is key to increasing the reach of your business.
From now on, we’ll show you the practical side and help you with a step-by-step process to create your website on your own.
There are several tools available online, both paid and free that allow you to create a website.
What you need to do is analyze your type of business and then choose a website builder that supports what you will put on your page.
In this post, we will show you how to create a website by hiring a hosting service and registering your domain, which is the best way to generate authority in your area of business.
Ready?
1. Register your domain
Go to domain.com to choose your website’s name.
This step is very important because when you purchase a domain name, it prevents others from using the same name as you.
To do so, simply go to the domain.com website, enter the desired domain name in the indicated field and click Search to make sure that the name you have chosen hasn’t been taken.
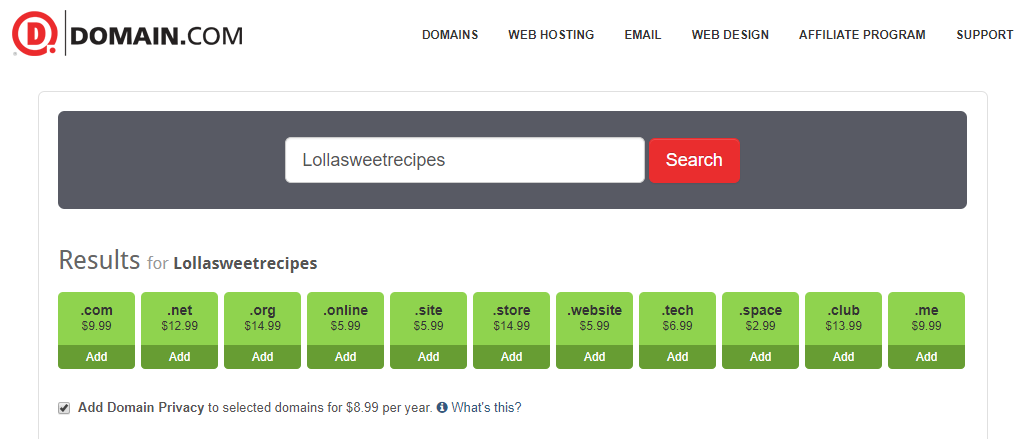
If the name you have chosen hasn’t been taken yet, click on Add and fill in the next fields with your personal information to purchase this domain name. Then you will receive an email to proceed with the registration process and to choose the form of payment.
2. Hire a hosting service
The hosting service will put your website up and running and keep it running.
There are many options on the market for this purpose, both free and paid. However, the major problem of choosing a free hosting service is that they have many restrictions and can become unstable, which can cause your website to shut down.
Paid services, on the other hand, you have several other options such as HostGator and SiteGround , which have plans starting at US 3.95 a month. The important thing here is to search around and choose the one that is best for you.
3. Choose a website builder
Once you have your domain and a good hosting service, the next step is to build your website.
There are several options for you, including hosting services’ website builders.
To decide which one is the best, check if the website can be customized, if you can select a template related to your business and include videos and images to give your pages your own look.
The good thing about these builders is that most of them are very self-explanatory, so it’s easy to create a website with the help of these tools.
But if you can’t invest any initial capital in creating your website, there is another way to go about it, which is through free website builders that already include the hosting service.
However, as we said earlier, the problem with this type of website is that you will not have a unique domain name for your brand, which can hinder your website’s ranking in search engines.
We have selected Google Sites, which offers integration with online stores, Google Maps, and is mobile friendly, for example. But you can choose any other tool you prefer.
Google sites
1. Create a Google account. If you already have one, use yours.
2. In the search bar type Google Sites. On the main page click Create in the right corner of the screen. You’ll have two options: Google Sites Classic and New Google Sites. Select the second option.

3. After you’ve selected the New Google Sites option, a new window will now open with your site’s homepage.

This will be the first image that people will see as soon as they visit your website. That’s why it’s important that you invest time to make a good first impression; and especially, so that this page can be identified with your brand.
You can customize this page in any way you feel is best for visitors to look at it and know that it’s your website.
4. Add your logo to the left-hand corner of the screen, enter the website name and page title with your brand name or even a phrase that summarizes your business.
Under Page Title you can even Change the Image and choose between Uploading or Select an image. In the first option, if you have a banner with your brand identity, you can add it to your website. But if you still don’t have anything specific, you can use the Google image bank and choose one that reflects the niche of your business.

5. Add texts, images, embed a URL (if you have a blog or even your social networks) and upload files such as videos to further improve your site’s home page. To do this, simply choose the action you want in the right corner of the screen, immediately below Insert.
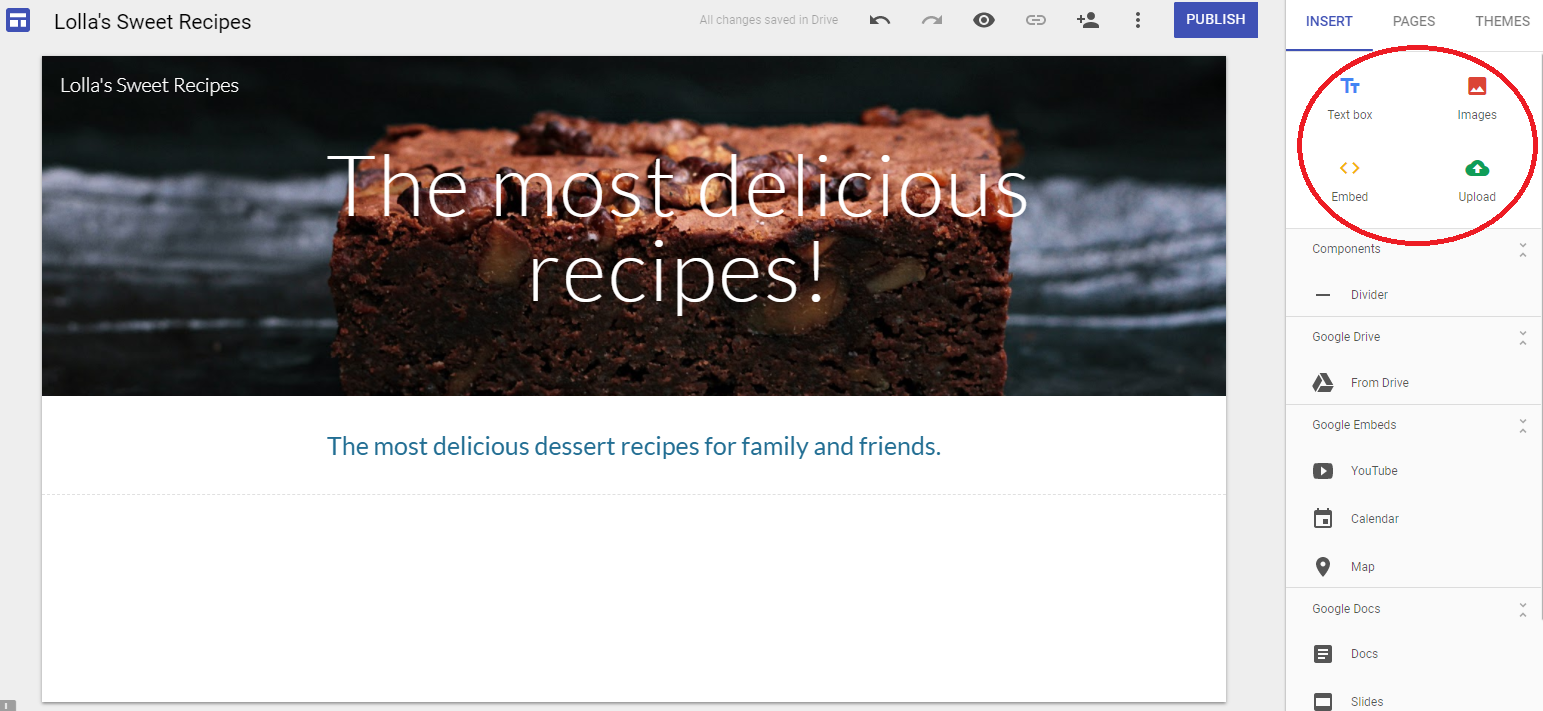
You can click on Map and add the address of your business’ headquarters or physical store. In addition, by clicking YouTube you can place videos from your channel on your site’s homepage.
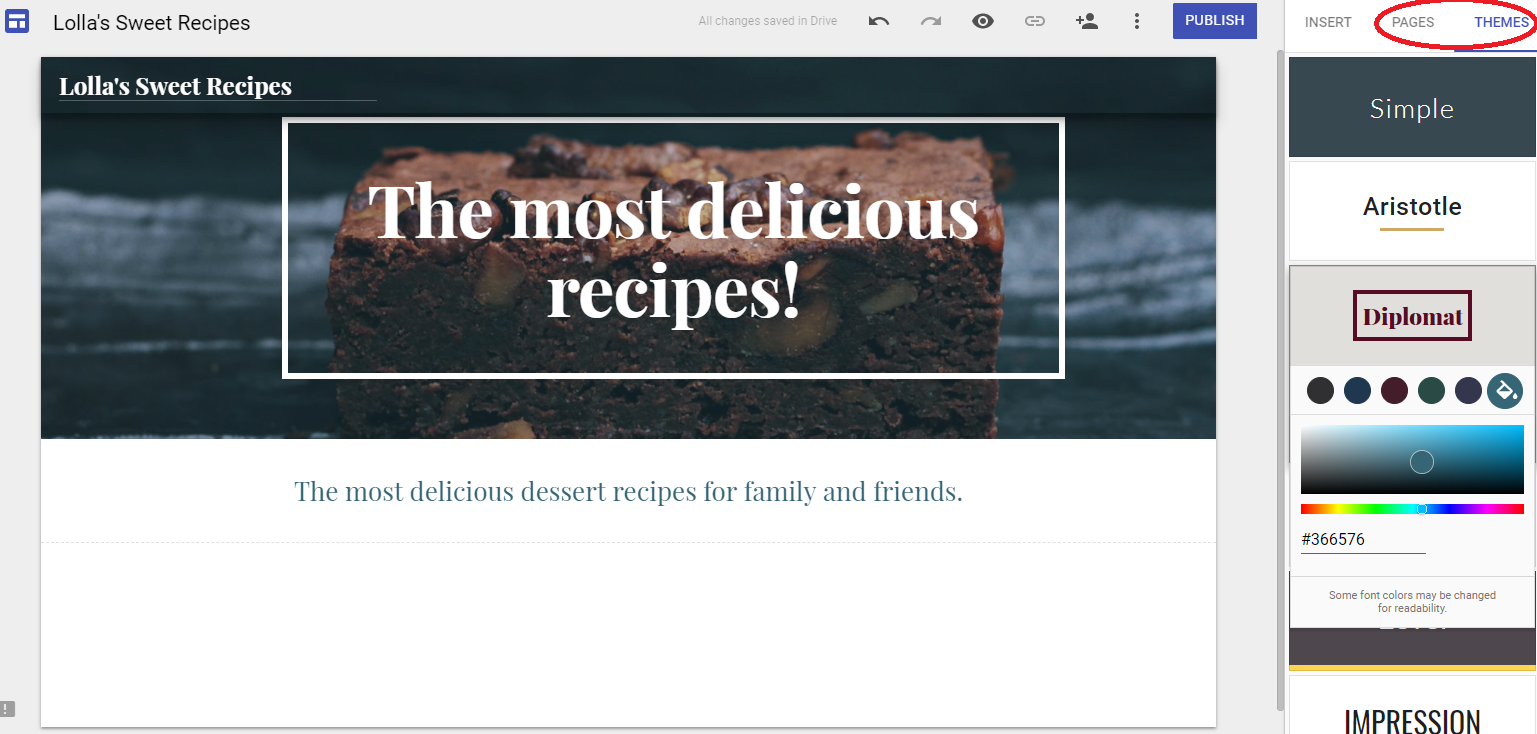
6. Click Themes to choose your text font style and color and Pages to add other pages to your website.
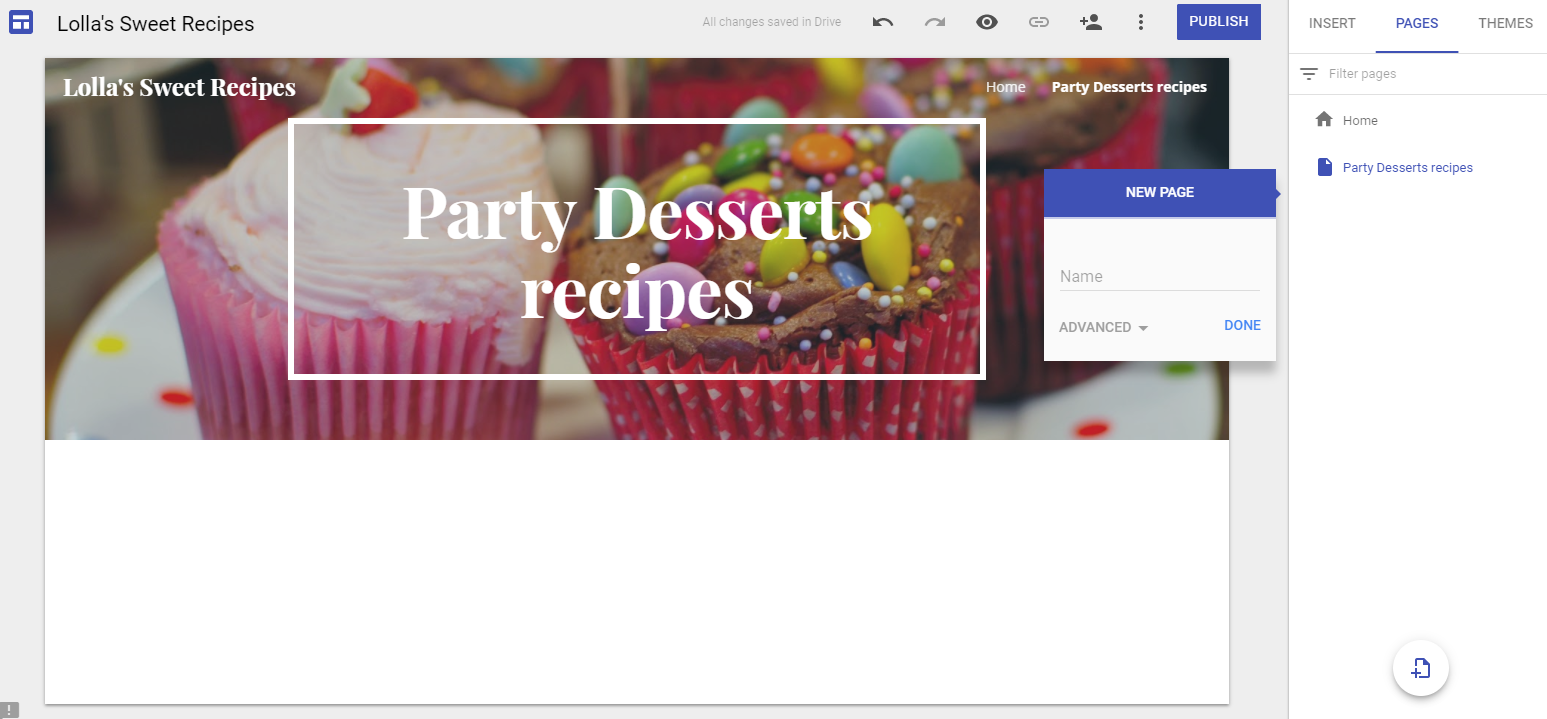
7. Add as many pages as you need in order to create a showcase for your business. Each time you add a New page, the title you choose for it will appear at the top of your site’s main page. Don’t forget to customize all new pages in order to always give your identity to your website.
You can create call to action buttons on every page of your site. Just add the landing page to where the website visitor will be routed.
8. When you have added all the pages, texts, images, and videos to your site, click Publish at the right-hand corner of the screen.
Choose your Web Address name. If the name has already been used, Google will prompt you to rename your site.
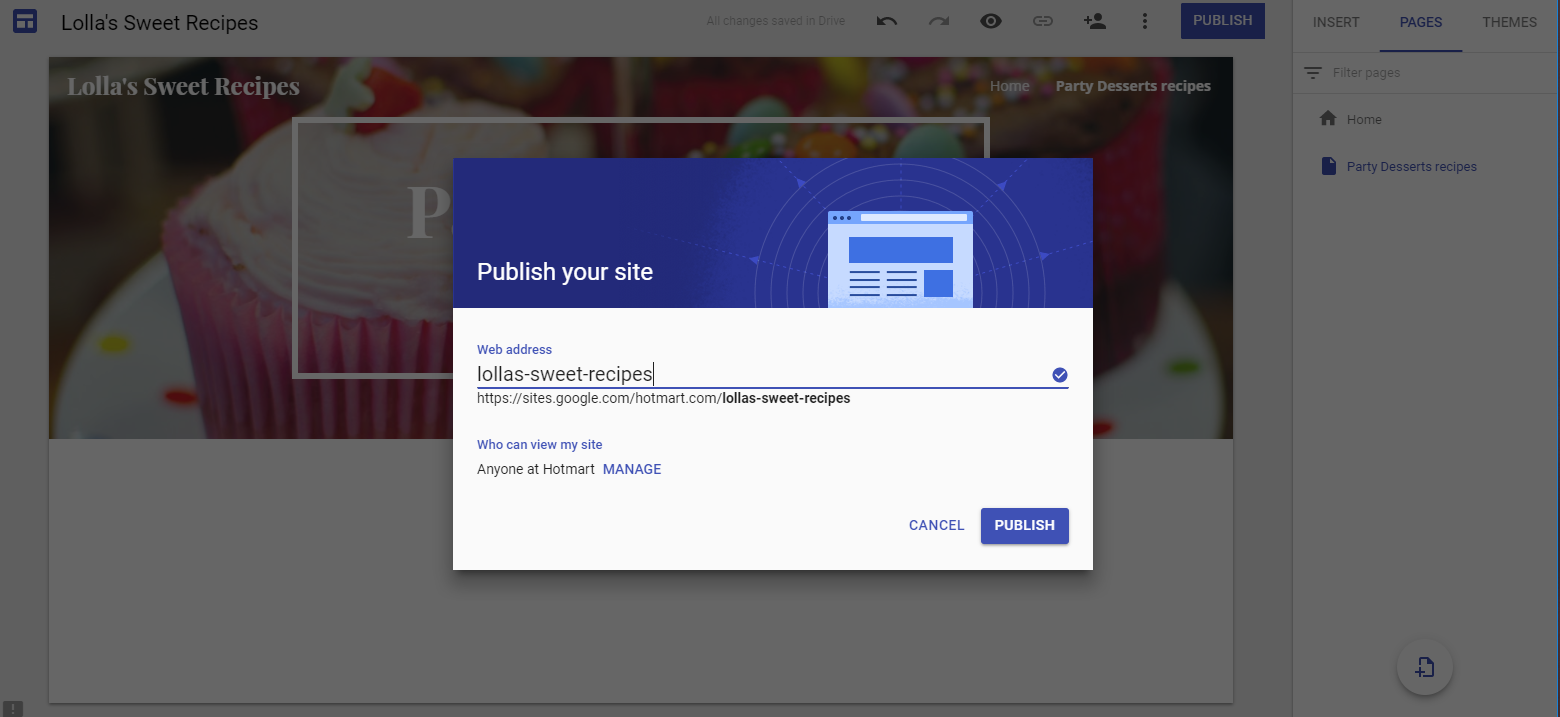
9. Click View to see what your site looks like. You can make changes whenever needed.

There you go! You have just created a website using Google Sites. However, as you can see, your URL will always appear with sites.google.com before the name of your business. Therefore, this is not a recommended option because, as we said, you won’t have domain authority.
So, see how you can create a website on your own?
So, be sure to use this strategy in your business. In addition, take time to read our blog post on how to create a blog and further increase your products’ or services’ promotion.


