How to edit video on your iPhone: Adding Visuals with iMovie
Sharpen your video production skills with these 4 easy tips on using iMovie iOS. Learn how to use Cutaway, Picture in Picture, Split Screen and Green/Blue Screen.

What will we see in this post
The world is changing quickly, the digital universe even faster and the market expects you to keep up with it all with ease and flexibility. Within this ever evolving marketplace, the introduction of home office for millions around the world has been introduced in a way that few could have ever expected. Now, more than ever, it has become common to be asked to do things for work that only a few years ago would have beckond a reply of, “That’s not my job.”
Taking on the role of a former coworker or being expected to work with technology you might not be familiar with have become commonplace. We’ve witnessed everything from famous TV personalities filming their shows alone and from their homes to grade school teachers learning how to teach their students online in a matter of days.
As different the above examples might seem, they both highlight the increasing demand for video that is not professionally shot but high-quality is still the expectation. Whether it’s targeted toward high school students, office coworkers or a TV audience of millions, viewers have little patience or tolerance for low-grade video production.
Fortunately, the amazing tool you have in your pocket can work wonders in the department of video production if you are willing to learn how to use it to your advantage. So, let’s take a minute and learn 4 simple ways you can add visuals using iMovie on our iPhone, shall we?
Which app is iMovie?
iMovie is the free video editing app found in iPhones. It’s a simplified version of the desktop software with the same name, but is one of the most powerful video editing apps you’ll find on a smartphone. To see where it ranks among other video apps, check out this post.

To find it on your iPhone, just tap the purple icon with a star and camera that came already installed with your phone. From there, you can add the base track that you want to work with from your photo library.
Why should you add visuals?
Adding extra visuals is a great way to level up your video production prowess. You’ve probably heard of B-roll or noticed all the different shots flying by during narration in movies. Fluidly moving to different things to look at in your video is key to keeping your audience engaged. For teachers, visuals make their job of explaining things easier and increase the chances of their students retaining the information.
But the key is to use your visuals correctly. You don’t want something that is supposed to work as an aide distracting or taking away from your main focus in the video. For some great ideas on how to use visuals correctly, check out Visuals to Include in Your Online Course.
1. The Cutaway
To get things started, let’s take a look at a classic way to add visuals to your video using iMovie, the cutaway. The cutaway is perfect when you want to add visuals but want to keep the voice or sound from the main track.
Looking at the main editing screen in iMovie, we can see our main track is already there. To add a cutaway visual, we just need to hit the plus icon.

From there, we need to select the folder where the visual can be found. You can choose to add another video or a still image as your cutaway. Tap on the visual you want to add and a box pops up with icons for plus, play, and three dots.
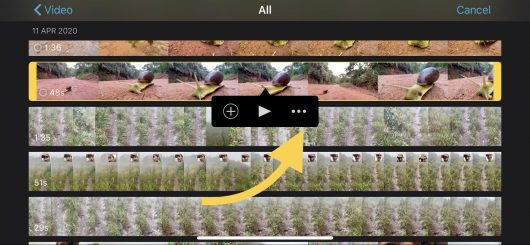
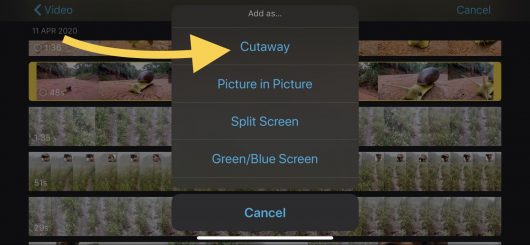
Tap the three dots and now you have options for different ways to add visuals. The first option is Cutway and by tapping that you are back on your editing screen where the visual has been added can now see it above the main track.
With our visual above and the main track below, we can still edit both as you please. To edit the visual we’ve just added, click on the track so that an orange box appears around it. Now, you can splice it or cut down the length.
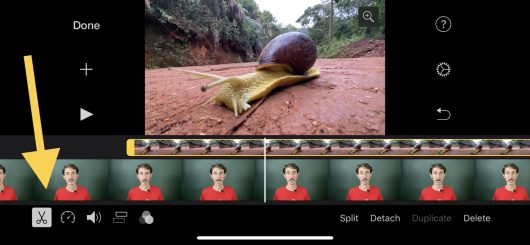
You can also tap the audio icon if you want to include the audio that might be with the visual you are adding.
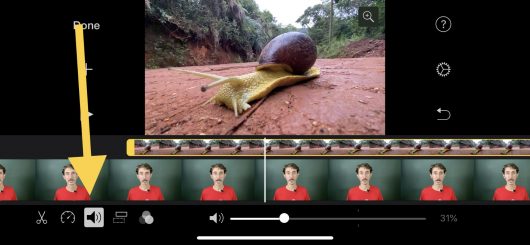
If you’d like, you can slow down or speed up the frame rate here and play around with the color or add filters. 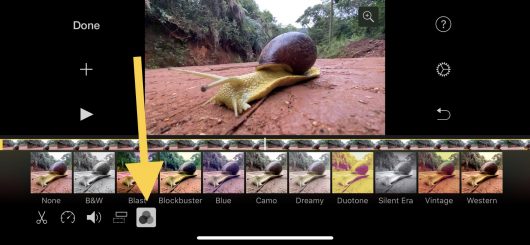
2. Picture in Picture
Next, let’s take a look at the Picture in Picture option. This is a great option if you want to keep your main track as the primary focus and have the visual in a smaller box. Like the box over the anchor’s shoulder in the nightly news.

To add this type of visual to your course, let’s go back to our main editing screen in iMovie where we can see the main track that we are working with. Just like with the cutaway,
tap the + button, select the type of media we want to use, and you’ll get the same box as before, and we need to tap the ellipsis and select Picture in Picture option.
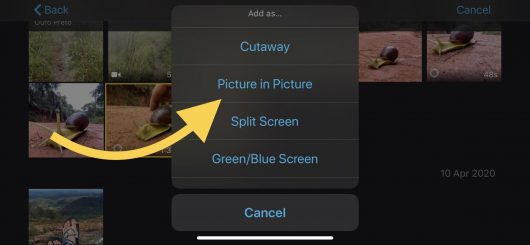
Now you can see your main image and the secondary image in the box. To edit the secondary image in the box, just tap on the track so that the orangish box appears around it, and from there you can control the sound, edit the clip down, and change the color, just like we saw in the cutaway option.
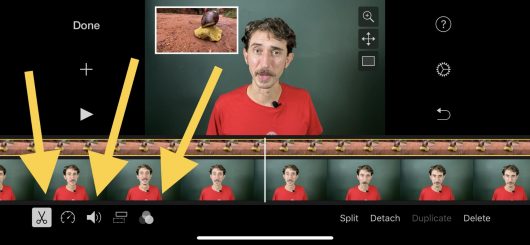
The things that are different with Picture in Picture are your options to change the size and location of the box the visual is in by clicking the cross/arrow icon. Now, you can make the box larger or smaller and also change the position on the screen so it won’t cover up anything on the main track.
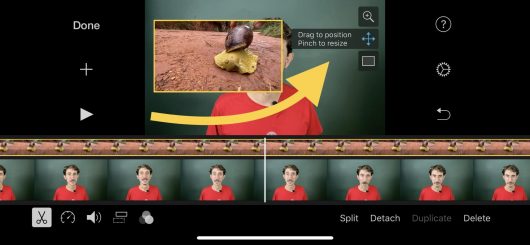
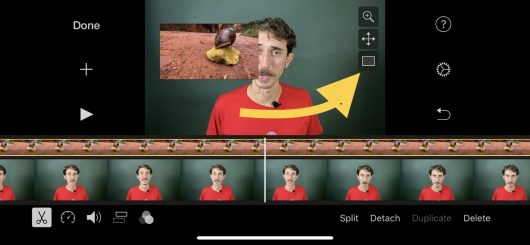
One last thing here, you can also decide if you want a border around the secondary image or not.
3. Split-Screen
Next up, we’ll take a look at an option that allows your main track to share the screen with your visual proportionally by dividing the screen in half.

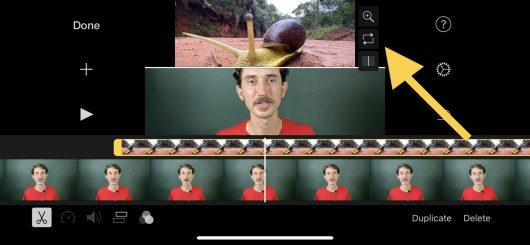
From our main editing screen, we tap +, choose the visual we want to add, tap the ellipsis, and select Split Screen. You have the same editing options when selecting the track with the visual.
Additionally, you can change how you want the screen to be split and you can take out the border if you want.
4. Green/Blue Screen
Our final way to easily add visuals in the iMovie app is one that will be familiar to anyone who knows a little about how special effects in most movies are made, the Green/Blue Screen. As the name explains, this effect works best when you are filming with a solid blue or green background.
Once again, we need to hit the PLUS, add our visual, and select the Green/Blue Screen option.
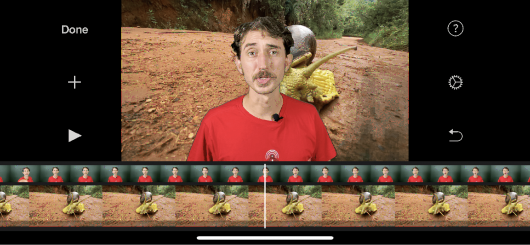
Tip: the image that you want to appear in front, what you actually filmed in front of the blue or green screen, you’ll want that as your secondary image. The image of the man with the green wall behind is the secondary image on the editing screen. The main image on the editing screen is the image of the snail.
Play around with the Green/Blue Screen to get it right. It can be a fun option to incorporate in your video.
One last thing about all of these options: once you have one selected as your visual, you can easily switch the way you are using as a visual by hitting that layer button by the audio option.

And like that, you can switch to cutaway, picture in picture or split-screen without having to reload it again.
So, those are 4 easy ways to add visuals all on your iPhone in iMovie. If you want to see a video showing how to use all of these effects, check it out here. Have fun with these options and find ways to include them in your videos to give things a more professional look.
As every market continues to evolve and demand a mix of different skills, pay attention to the easy ways you can hone your skills and keep offering high-quality work. This way you won’t be caught off guard the next time you’re asked to do things that might have made you want to say, “that’s not my job,” just a few months before.
Talking about the changing job market, make sure to check out this blog post about the fastest-growing jobs so you can know what to expect in the near future!


