
What will we see in this post
As you may know, Hotmart offers an exclusive and free Members Area. What you may not be familiar with yet are two automated forms of connection: HotConnect and Webhook.
The assistance of a developer is required for these forms of connection. But even then, there are often questions about how to best perform this type of integration.
This post will help you choose the best way to integrate the users’ system on the platform and we’ll show you some positive advantages of each option.
HotConnect
HotConnect is a way to connect the users’ systems to the platform using the APIs at this link.
The main features of this tool are:
- Credentials
- User authentication
- App authentication
- API
To access HotConnect:
- Log in to the platform at: https://sso.hotmart.com/login
- In the upper right corner, click on the dots icon next to your profile picture
- A tab with the following options will appear:
- Page Creator
- Email Marketing
- Webinar
- Products
- View all of the tools
- Click on View all of the tools
- Scroll down and click on the HotConnect button
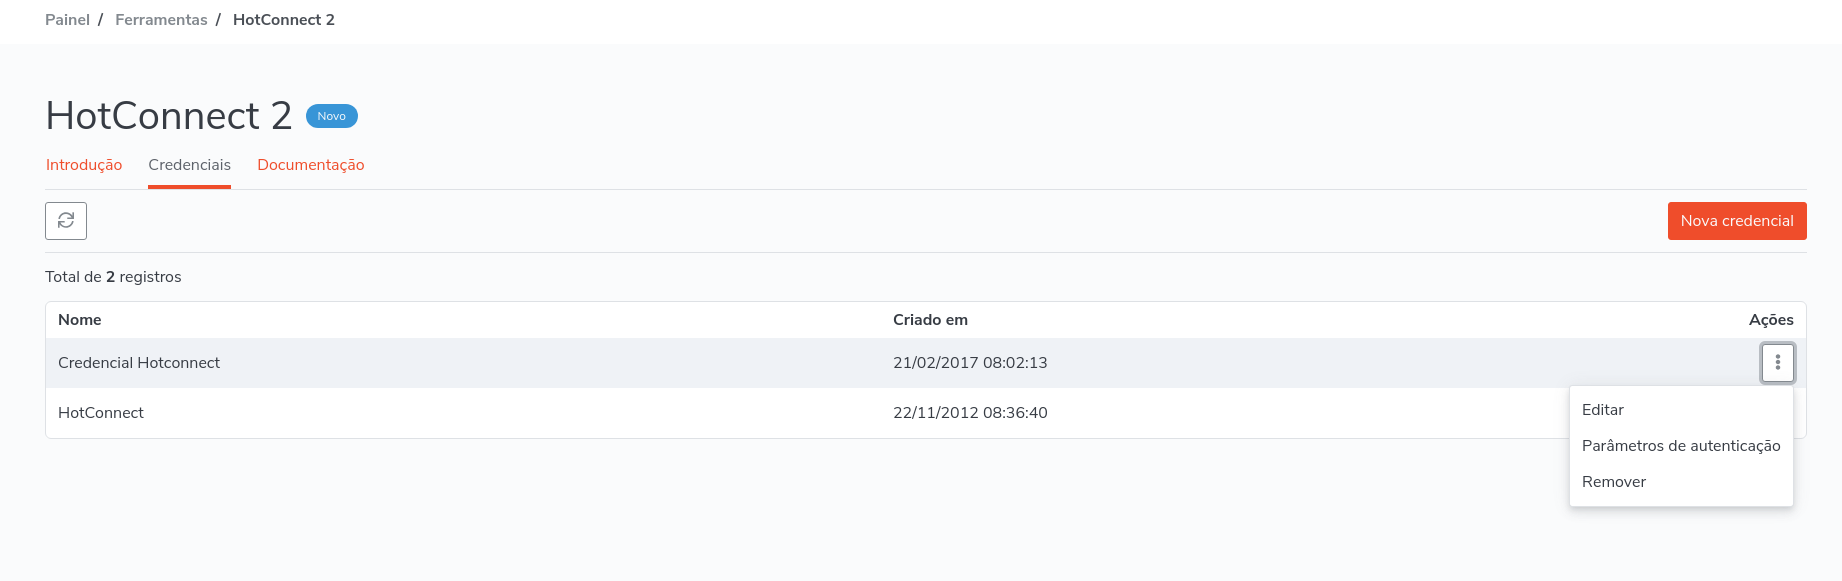
Credentials
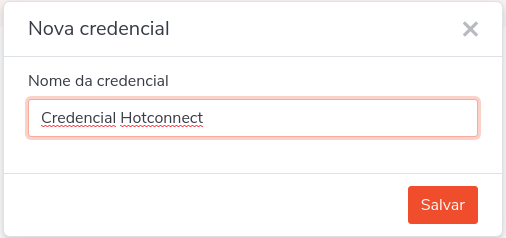
Before you start using HotConnect, it’s important to create a credential in the Credentials tab. To do so, click on the New credential button on the right side of the screen.

After you click the button, a pop-up will open.
Name the credential and save it.
When you click on the Actions icon, you’ll see three options:
- Edit: allows you to change the name of your credential;
- Authentication parameters: shows the parameters that are needed to use HotConnect features;
- Remove: deletes the respective authentication. Consequently, systems using this credential will stop working after removal.
When you click on Authentication parameters, a new pop-up will appear with the credentials to access HotConnect features, such as:
- Client ID: unique credential identification key;
- Client Secret: code to release the credential;
- Basic: code generated to access HotConnect resources.
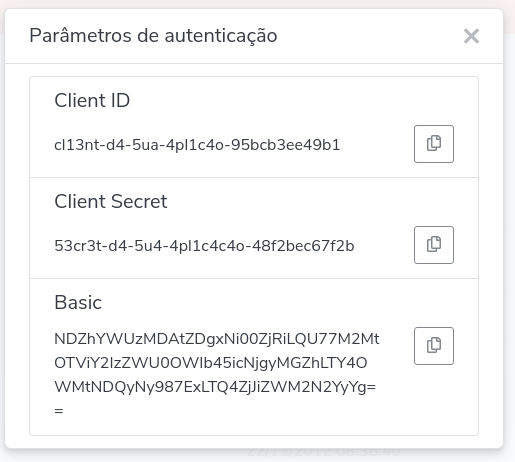
It is important to note that, for greater security, access will only be granted if all the information is correct.
With the credential, we can now use HotConnect resources. Next, we will describe the main application scenarios.
User authentication
Through this feature, the user logs in to Hotmart, which then provides access to information from the HotConnect APIs.
This feature is very useful if your software needs user information from the platform.
An example of this are systems that generate invoices through the sales history. When the creator logs in, the system can generate the necessary invoices with the user’s token.
Keep in mind that this feature can only be used with the user’s prior authorization.
Application authentication
This is often the most used functionality of HotConnect.
It allows your application to automatically use all tools, but first, you need to authorize your app.
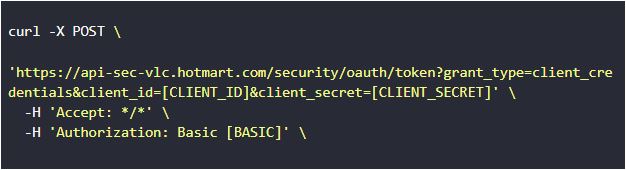
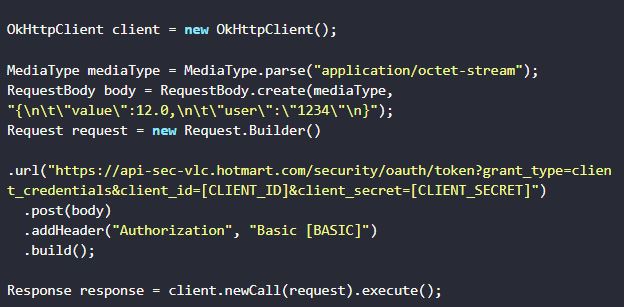
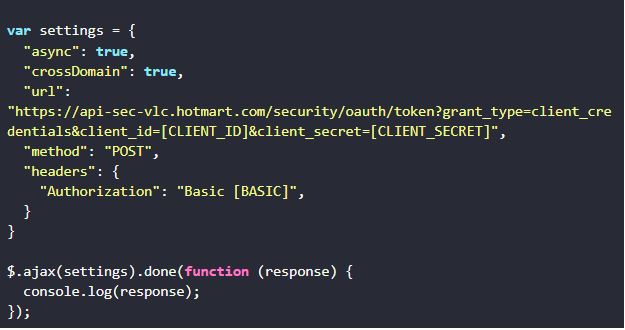
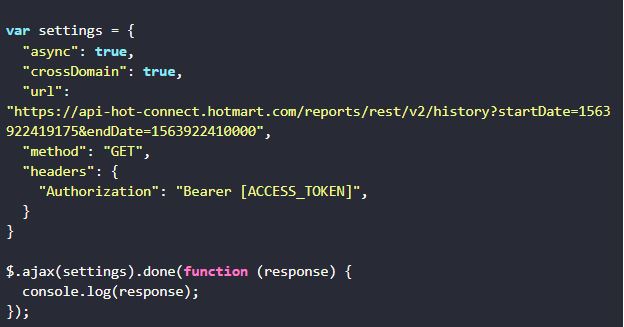
With the credentials already generated, the request must be made as follows:
Don’t forget that [CLIENT_ID], [CLIENT_SECRET] and [BASIC] must be changed to the authentication parameter values.
To make it easier, follow our example code.
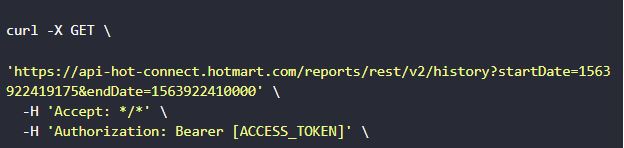
Curl:
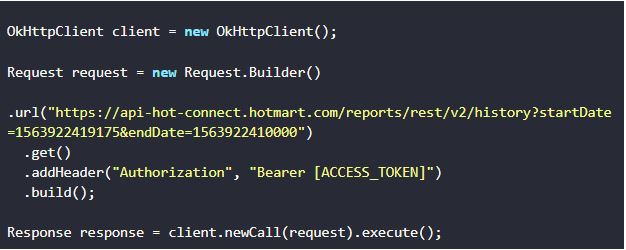
Java:
Javascript:
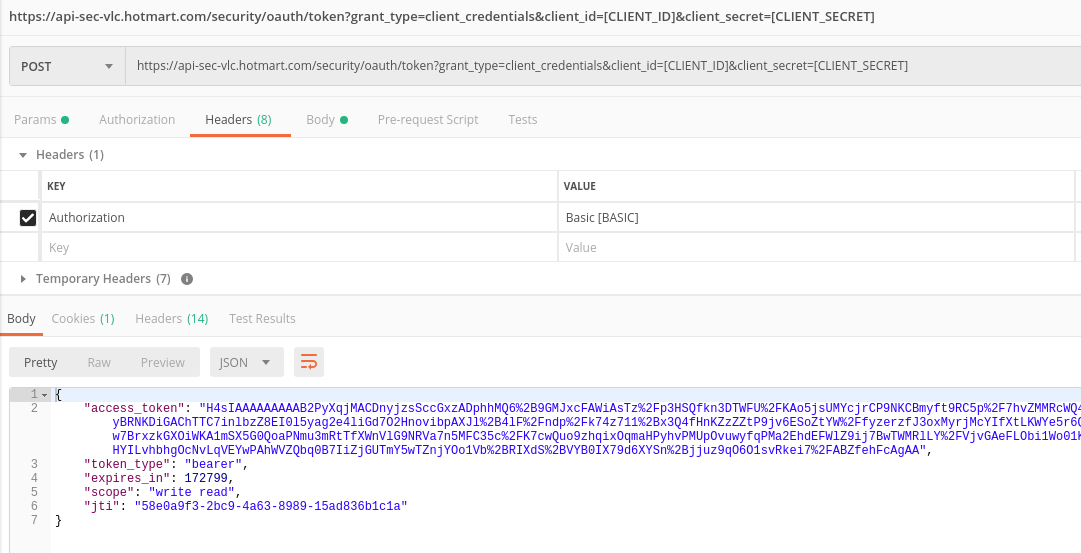
If the parameters are correct, you’ll receive the following return JSON:
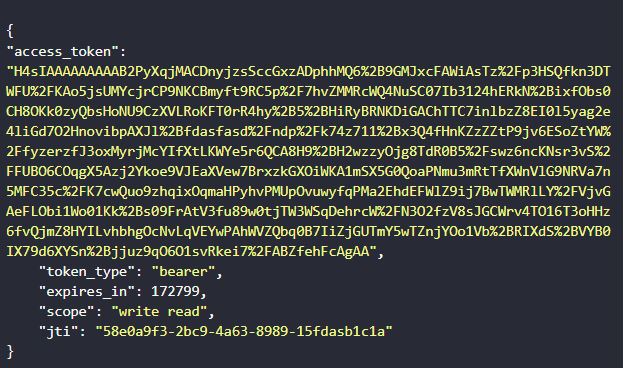
With this access_token in hand, everything from HotConnect can be carried out by adding the request header in the parameter “Authorization” -> “Bearer [ACCESS_TOKEN]”.
It should look like this:
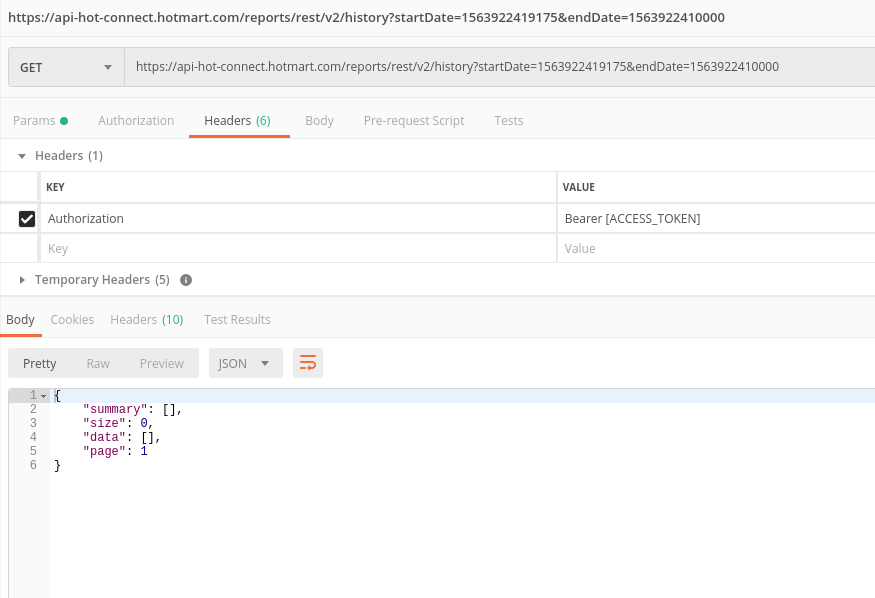
Take a look at the examples.
Curl:
Java:
Javascript:
APIs
HotConnect APIs allow your system to obtain all user information within Hotmart, such as:
- Affiliations: Allows you to access your hotlinks for products with affiliations and create promotions that are more automated.
- Products: Manage your product, create new offers and recover all possible prices for which your product is offered.
- Reports: Retrieves all purchases and provides their details. Remember that affiliate sales data are only available if authorized by the creator.
- Subscription: Allows you to access information about your customers’ subscriptions.
- User: information about the user using HotConnect.
Positive and negative points of HotConnect
Many developers think this is the best way to connect, since the control of seeking information would be the sole responsibility of the customer’s system. But this may also cause some problems.
Let’s imagine that your software behaves as follows:
After a purchase is approved, it sends an email to your customer containing a bonus. If it was paid for in a single installment, the system should only send this message when the purchase has been approved, and only once. Ensuring this should be your system’s responsibility and making it work can be quite laborious.
In addition, there are routine tasks that your software must carry out from time to time to check if there have been any changes in the status of the transactions of your choice.
Doing this several times a minute, in addition to being expensive, can result in some requests being blocked by Hotmart to avoid overloading the services.
On the positive side, you can review and check the history whenever you want. You can also access your product to make changes that will be reflected on your page.
Webhook
Webhook is what we use to passively notify the system. This means that your system will only wait when there’s a purchase or subscription change.
Before starting, your system must be ready with an API waiting for the POST of the activities that will take place.
Suggestion: the first thing that your system should do after receiving the request is save the data to store all the information, if necessary.
To start using this functionality, just click on this link, where you’ll find the configuration, documentation and send history.
Let’s discuss each individually.
Configuration
Click on the + button on the right side of the screen to add a new webhook.
After clicking, a window will open where you can select for which types of events the webhook will notify the system.
Name the setting in My setting.
The new webhook allows segmentation by order status, subscription changes, and cart and product abandonment.
In Send to URL, add the API url of your platform that is waiting for the POST request.
After saving, a list will appear with all the APIs that have already been configured.
On the right side of the screen, you can send a test to, edit or remove your setting. You can also temporarily deactivate it.
Segmentation test
When using the webhook, you can trigger your API whenever you want with the tests we provide.
By clicking Send test, you can choose which type of event you want to test. If you want, you can test them all at the same time and see how your system behaves when receiving multiple requests.
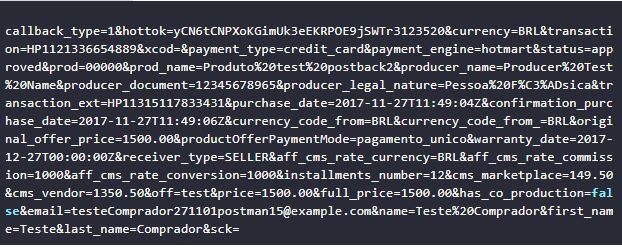
For order tests, a form with a model similar to this one will be sent as QUERYSTRING:
In cases of cart abandonment and change of plan, we have already updated requests to a better standard using JSON. The POST for these cases will be in the following format:
Cart abandonment:

Change plan:

Documentation
In the documentation section, you’ll find everything we are going to send for each type of notification.
Next, we will highlight the most important fields for you to check in your system.
- Hottok: Verification token. Each Hotmart account has a unique Hottok so you can verify that this request is actually being made through our webhook.
- Prod: Identifier of the product that was purchased or canceled.
- Off: Identifier of which offer was purchased.
- Price: Offer price at the time of purchase
- Email: Buyer’s email address.
- Doc: Document informed by the buyer when purchasing a product.
- Transaction: Transaction number generated by Hotmart.
- Status: Purchase status. Possible values: approved, canceled, billet_printed, refunded, dispute, completed, blocked, chargeback, delayed, expired.
- Subscriber_code: Sent in cases of subscription, it’s a unique identification code for each subscription.
- Subscription_status: Subscription status. Possible values: active, canceled, past_due, expired, started, inactive.
- Full_price: Total sale price.
- Currency: Field used to display the payment currency.
To control your orders, these fields should be enough.
It’s important to know that we do not send buyer information to affiliates who are not given permission from the buyer via release on the platform.
History
In addition to all the points mentioned, the history tab allows you to follow the responses we are receiving from your API when sending the POSTs.
Some common responses are seen below:
-
- 200: Positive response to Hotmart saying that it has successfully received our request.
- 401: Unauthorized. When this occurs, your system has some type of block that must be removed for requests to function normally.
- 404: NOT FOUND. Often, when this happens, either the system is down or the URL provided is incorrect.
- 500: Internal server error. Your service was able to receive our request, but there was a problem and it was unable to process it correctly.
- –1: TIME_OUT: we waited for our response timeout and didn’t receive anything.
For all errors, we perform 5 retries and you can view the latest response in the details of each history.
If you have a problem, you can request the reprocessing of the request once it’s been solved.
Positive and negative points of Webhook
Webhook is very useful for cases where your application has to make an instant decision right after an event, such as sending an email after a purchase approval.
In this case, your system already receives a warning after the status change and the system can carry out the desired flow.
In addition, since the reprocessing tool and request history are under Hotmart’s responsibility, it’s one less concern for your system.
As negative points, keep in mind that for data created before your system went live, requests were not made. That is, it is necessary to export previous data.
Another problem is that, in the case of simultaneous sales, such as a launch, if your system is not ready, it can go down and lose some POSTs. But of course these POSTs can be reprocessed.
Conclusion
There is no obvious choice for the type of integration you should use.
In each case, you need to analyze which is the best option, and there is an infinite number of options for what can be done and for each application there is a type of connection that will be more appropriate.
All in all, if you need instant processing, using the webhook is a good alternative. Remember to scale the system in case of unusual behavior such as a launch.
If you want to make a system that will run from time to time to update itself through history, HotConnect would probably be a better option.
Anyway, the important thing is that you learned a little more about these solutions from the Hotmart Universe.
Of course, keep in mind that considering connection options requires technical development knowledge. Hotmart creates solutions with the goal of helping our creators and affiliates focus on one thing: working with what they love.
Want to know more about Hotmart’s tools and solutions?